First, let me cite Timothy Hult on this introduction to his Denali guide. I think it sums up a few points that people who have not attempted Denali would not understand otherwise. If you would like to read his full guide, you can find it here.
Trip Info
Date: Climbing May 16, 2015 – June 4, 2015. Sea Kayaking cool down. Fly home June 12th.
Team: Gypsies of 14k Members: Jeff Rogers (Expedition Leader), Alex Calder
Route: West Buttress
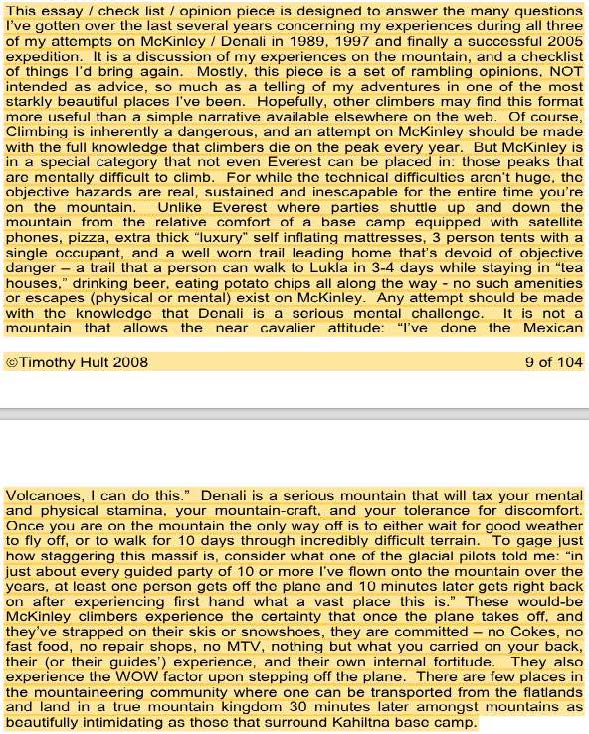
Ski Descents: All of the route below 14,000ft, Lower West Rib, Below fixed lines, Rescue Gulley, Lower summit ridge to Rescue Gulley to 14000ft on West Buttress Route
Itinerary
A couple of things to note is a typical party takes 21 days to reach the summit and camps at 17,200ft. We had 30-days of food and 3-gallons of fuel to maximize our ability to wait out storms and try for the summit multiple times if needed. Thankfully the only real storm we were hit by was at the airstrip while we were trying to leave.
It’s worth noting that we were given two gallons of fuel and another five days of food from a successful guided group before their descent. Both of which we did not use!

The first three days are spent arriving to Anchorage, spending a day buying food, and then another travel day from Anchorage to Talkeetna via the train, and a day waiting for weather to clear so we can fly in. An average day would be a 5 hour carry up and a 10‐minute ski down. We had days that ranged from 3 hours to 10 hours while carrying/moving camp. And summit day was the longest by far at 17 hours.
The amount of climbers on the mountain while we were there was approx. 300 at various spots from 7,200-17,200ft. Skis significantly shorten the carries. I recommend anyone who is comfortable on skis use them until 11,000ft, experienced skiers can use them on the entire mountain with good snow conditions. We, unfortunately, did not get those conditions.
*Day 1: Fly in, drop off climbers at Ruth gorge, pick climbers up at the Moose’s tooth Land at Kahiltna Airstrip, Repack, Bury a Cache, Move to 7800
Day 2: Haul Load to 9700, Camp at 7800
Day 3: Move to 9700
Day 4: Single Carry to 11000
Day 5: Haul Load to just below polo field, stopped by wind
Day 6: Haul Load to just below polo field, stopped by wind
*Day 7: Move to 14200, Single Carrying from the polo field, windy (DUMB IDEA)
Day 8: Rest Day, build and fortify camp at 14200
Day 9: Storm Day, ski from 15200ft on the West Buttress
Day 10: Ski from west rib at 16000ft
Day 11: Try to acclimate by getting to high camp at 17200ft, get stuck behind guided group, turn around at Washburn’s thumb, bad headache this day for me
Day 12: Ski from West Rib at 16000ft, Go over to the edge of the world and take many pictures.
Day 13: Rest Day and prepare packs/drink tons of water for summit day
*Day 14: Summit day, 4:00am start, 12hrs up 5 hrs down, back at 14000ft, coughing and headaches on ascending pig hill and on the descent. I also spent almost two hours chatting and rehydrating with a couple climbers at 17.2k. Thanks for the water!
Day 15: Rest Day
Day 16: Partner decides he wants to leave and try to beat the incoming storm, we descend, pick up cache at 11000k after searching for an hour.
Day 17: Storm Day at airstrip
Day 18: Storm Day at airstrip
Day 19: Get picked up around noon by Talkeetna Air Taxi, Dry Stuff, Drink, Burgers, Drink, Live Music in Talkeetna, Pizza, Drink, Sleep at Talkeetna Air Taxi
Day 20: Hitch a ride to Anchorage, Spenard Hostel
Day 21: Spenard Hostel, Buy supplies for Sea Kayak Trip
Day 22: Train to Whittier, Start Sea Kayak Trip
Day 23: Sea Kayaking
Day 24: Sea Kayaking
Day 25: Sea Kayaking, Return to Whittier, Train to Anchorage
Day 26: Spenard Hostel, Dry stuff from Kayak trip
*Day 27: Fly home; sit next to morbidly obese woman for the flight=half a chair
Day 28: Arrive home
*=Hardest Days of the Trip
The Route
Just in case you are not familiar with the route here is a photo of it. Note we did not use the high camp at 17200ft, but we did use a camp at 9700ft just before Kahiltna Pass that is not on this photo. The lowest elevation along the route is 6800ft at the bottom of heartbreak hill.

Gear
The philosophy behind packing for this expedition was to sustain us for an entire month with no assistance from any other groups. Self-reliance is an important aspect of mountaineering and relying on other climbers can endanger you and whomever you are relying on.


First Aid Kit
- 2x pair Surgical Gloves
- 2x Antiseptic wipes
- 2x triangular bandage
- Ace Bandage
- Gauze Roll
- Diamox 250mg per dose (my buddy had 125mg tablets, he double dosed after seeing mine)
- Dexamethasone 4mg per dose
- Ciprofloxacin HCL 500mg per dose
- Azithromycin 250mg per dose
- Advil (30)
- Low Dose Aspirin (8)
- Benadryl (15)
- Laxative (6)
- 2x Non-stick Gauze Pad
- 2x Medical Tape
- 5x Cotton Swabs
- 4x Butterfly Bandage
- 3x Pepto tablets
- 1x tincture of Benzoin
- 3x Safety Pins
- Backup lighter
- Emergency Blanket
- Neosporin
- 2x Moleskin sheet
- 2x Foam Blister Sheet
- Burn Crème
- Codeine (cough suppressant)
- Imodium (anti-‐diarrhea)
- Syringe
- Knee Brace
- Medicated Gold Bond (Not necessary but I like having it, maybe travel size is better)
We wanted to be prepared for anything. Another thing in our medical kit, Wilderness First Responder certifications. Knowing how to treat things that can happen is more important than any of this stuff.
Repair Kit
- Extra Fuel Cap (Not needed, pumps serve as fuel caps)
- Stove repair kit (MSR Expedition)
- Spare fuel pump
- Zip ties (10)
- Hose clamps (forgot these, essential)
- Bailing wire (5ft)
- Spare waist belt buckle (Gave this one away to a fellow climber who broke his)
- Spare small buckle
- 550 cord (50ft)
- Gorilla glue
- JB-Weld putty (Repaired my Whippet pole after it snapped, life saver for a skier!)
- Gorilla tape (Duct tape on roids)
- Extra lighter (Not needed if each person has one and theres a flint & steel w/stove)
- Diamond file (Ski edge maintenance)
- Extra compactor bags (Never enough!)
- Volie scraper
- Multi-Tool (Essential, we brought a cheapo one from Wal-Mart 10.2oz, a Leatherman squirt or juice would save you some serious weight here)
Equipment and Stuff
- Black Diamond Couloir Harness (Not the harness I’d go with again, you’re wearing this 99% of the time, so as long as it has the correct features weight is not a factor, comfort and ease of use is huge. The Couloir is a bitch to double back)
- 7 Non locking carabiners (assorted)
- 3 Locking carabiners (assorted)
- Petzl Ascender (Beats tying a Klemheist knot at every piece of pro!)
- 2 half length runners
- 1 full length runner
- 3 Ice Screws (Not used)
- Guide ATC (Not used)
- 4 Pickets (Make great tent anchors more than anything else. The guiding companies had already placed most protection on the route, but I recommend you always have one on your pack while in crevasse terrain)
- Grivel Whippet Ski pole (Absolute piece of shit)
- Camp Interalp Ice Axe (Oldie but goodie, 29oz of metal. Don’t forget to insulate for summit day)
- Homemade Prussik Loops (Experiment with lengths)
- Petzl Sarken Crampons (Sweet set of Pons, fit my AT boots and Barunstses with and without overboots)
- Miscellaneous cord for sled rigging and glacier rescue (Bring a ton and stash what you do not use at your cache at base camp. The best sled rigs used compression straps with fastex buckles instead of rope to cinch down the duffels on the sled.)
- Fischer Hannibal 94s 177cm (A great ski, could have gone a tad wider but overall excellent and very light)
- Fischer Ambition 10 Touring Bindings (I broke a pair of ambitions 12s clean off my ski a month prior to the expedition, however I was able to work with Mike Marolt at 8kpeak.com and get a pair of Ambition 10s sent to me right away, and I was sent a spare pair by Bill Ewert at Fischer to stash at base camp in case I broke the new pair. Thanks again for the help with your connections at Fischer Mike!)
- B and D Gear Ski Leashes (Not recommended, they loose their elasticity very quickly, would be an excellent product if it worked as designed)
- Black Diamond Ski Strap (Awesome, can be used to rig your ice axe to ski pole)
- Magic Carpet Nylon Skins
- Camp Pulse Helmet (Love this thing, perfect blend between a rock helmet and a ski helmet)
- Homemade Chest Harness (Webbing and experimentation)
- Avalanche Transceiver
- Snow Saw (Get the best freaking one you can find, ours was old as hell and could have been much better and saved us a lot of work)
- Screwdriver for binding adjustment (If only the Ambitions stayed where I set them…)

- 1995 Lowe Alpine Kanga Himal SE 100+15 (With modern gear, you do not need a 115L pack, my pack empty weighs 7lbs 13oz which is a ton, so think of summit day when you purchase a pack for this trip, my buddies Lowe Alpine 75+20 weighing in at ~5lbs seemed to be ideal. Do not go too light; it still needs to last for up to 4 weeks in a very rough environment. However if you have or need to do long unsupported trips without the aid of a sled, I believe my pack, and mystery ranch (Dana Designs) packs, have an appropriate suspension system to shoulder the 100lb load you need to do a 20 day backpacking trip. Good luck finding a modern day expedition pack with a suspension system able to carry that kind of weight.)

- Klymit Insulated Static V sleeping pad (Cheap, Durable and an R-‐value of 4.4, very comfortable design too, heavy at 25oz though. It was also getting soft day to day so I had to blow it up often, but now that I am back home I can’t seem to find any leaks anywhere and it has held an inflation for multiple days.)
- Blue Closed Cell Foam Pad (Don’t go with more expensive offerings here, the one I had was 9oz, is warmer than a z-lite and costs under 10 bucks. If you are a cold sleeper I would recommend getting the warmest inflatable pad you can rather than bringing a warmer closed cell pad. Also this item can be eliminated if you use a tent floor)
- Marmot Col -20F Sleeping Bag (Again if you want to pay twice the price you can go Feathered Friends or Western Mountaineering (my buddy used an overfilled Ptarmigan bag), but these can be bought new from an online retailer for $450 currently as I type this in 2015. The -40F bags are better suited to extreme altitude, in this case you are never camping above 17k, and in our case we never slept above 14k. Things to look for are a waterproof shell layer, space for items you need to keep warm and around 33-40oz of 800+ fill down. A 6’0” bag for me at 5’8” is just long enough with items in the footbox)
- Hilleberg Namantj 3 GT (A palace for us 2! Even with my partner taking up 2/3rd of the space every night! HIGHLY recommended, you could even go with a Keron 3 GT for even more luxury. The only drawback, a big tent means you need to construct a big camp. And Hillebergs lack pockets, headroom and gear lofts, which are very nice to have on a trip like Denali because you often have many little items bouncing around. A VE-25 or Trango 3 for a two-‐man team is a much cheaper alternative and are quite nice.)


- Forty Below foam tent floor (Super luxury with not a huge weight penalty)
- Sunscreen 1.5oz (One for each climber, then refill with a large group bottle)
- Tent Whisk (Not recommended, rather a super absorbent shammy or tent sponge does a better job of soaking up the condensation in bad weather)
- Rub On Sunscreen .55oz (Plenty)
- Chapstick (Interestingly enough the store brand chapstick had the highest SPF I could find, SPF 30)
- Cat Crap (Lens Cleaner/Antifog)
- Mini Microfiber cloth for cleaning lenses (Used way more than I thought I would)
- Toothbrush (One that has a case and is half length is ideal)
- Toothpaste .85oz (Use sparingly or bring two, barely enough for 19 days)
- Mountain Hardwear Expedition Duffel (Worked Great, however it is not waterproof, the fabric is and the zippers are not, ideally you want a 100% waterproof sled duffel, Sea to Summit makes one that is ideal for this trip. Waterproof is more of a luxury but it is so nice to have a gear “Garage” outside of your tent. We had read horror stories about how much of a nuisance sleds are but we were able to use them with little difficulty on the way up to 14k, descending though we could not find a good way to rig them)
- 96oz Collapsible Nalgene Pee Bottle (This sprung a leak and left my down bag filled with piss the first day of the trip, luckily the intense sun dried everything out in about a hour, I still recommend this as I have used these extensively on other trips, but you need to purchase a new one for every expedition or use something like an MSR dromlite if you intend to use the same one for every trip)
- FSR Radio (Good for emergencies, however everyone has a radio and they all stand up at 8pm and face the airstrip from camp for the weather forecast, so if you do not have one you can easily walk up to anybody and listen in)
- Arva Telepro Shovel (My partner broke the handle off of it a few days in. He has a history of busting avalanche shovels though. Remember you are not using a spade when on Denali, and if you are then you’re probably part of a big group. The best shovels seem to be Voile brand, they are bomber and heavy but with constant use and hard snow Denali requires a lot from your snow tools. Shovels should be full length, large blade, and have a D handle, one per person for smaller groups and 2 for every 3 people for larger groups)
Kitchen
- 6 Quart Ocean State Job Lot Pot (Probably could go smaller with this pot, but it is so nice to be able put shovel loads of snow into the pot at once. Ideally a 4-‐6L Heat Exchanger pot would exist, we saw parties with a 3L HE pot. That seemed to work well. Remember a heat exchanger will work both ways, meaning the water you just heated up will cool much quicker once you turn the stove off.)
- Deep Dish Alpine Frybake (A great addition to any group who is planning on baking or frying any of their meals, ideally we would’ve used it more, but the pancakes, cornbread, blueberry muffins, hash browns, meatballs etc turned out great)


- Pot Parka (Running your stove on low, and having a pot parka greatly increases efficiency of your setup, you will however have to wait a bit for the snow to melt. I think we averaged one 30oz bottle every 4/5 days. Alternatively you can blast your stove and with the pot parka snow will melt very quickly)
- 2 MSR Whisperlites (We had one white gas only and one international, the internationals seem to be very hard to prime due to the thicker pre heating tube, our non international however would prime very easily and was the workhorse of the expedition, running for multiple hours every day. If we were to go again we would bring 1 stove and an expedition repair kit and maybe a spare pump, the entire second stove is unnecessary. Make sure you have a nice bag for the stove/fuel because in extreme cold you will have to sleep with it to get it to work in the morning. A stove that isn’t working means no water.)
- 1.5L Nalgene with Forty Below insulator (The Velcro on mine sucked really bad, my partners did not, seems to be hit or miss with these)
- 1L Nalgene with EMS insulator (Zipper is bomber enough to unzip while frosted/frozen)
- 0.5L Nalgene with can coozy (Used as a Hot Drink Mug)
- Long Spork
- GSI Fairshare Food Bowl (The best food bowl in existence.)
- Plastic Spatula (A metal one will suit your frybake better, but will be heavier)
- Dr. Bronner’s Soap (Rarely used)
- Hand Sanitizer (Used multiple times each day)
- Flint and Steel (A superior way to light stoves in my opinion. We used it almost exclusively. Lighters are great but if they are cold or wet the sparker doesn’t even work. A large flint and steel will throw sparks no matter what the situation)
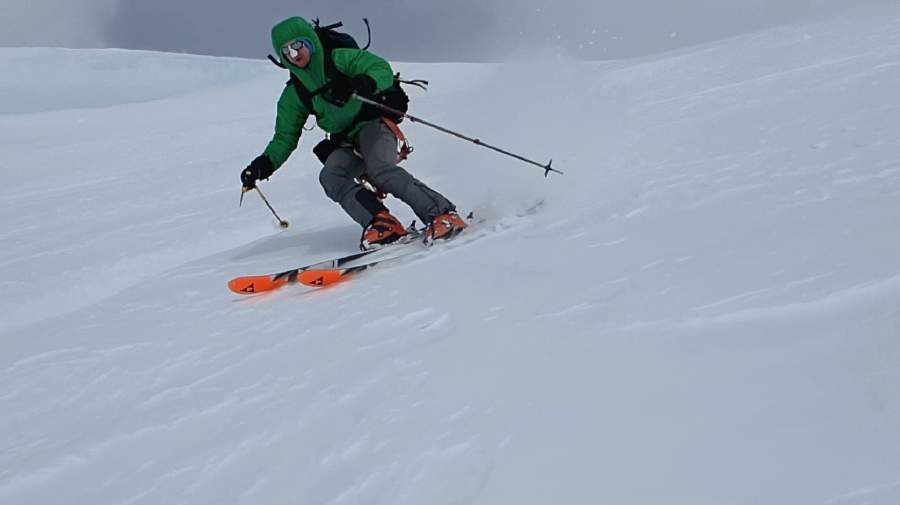
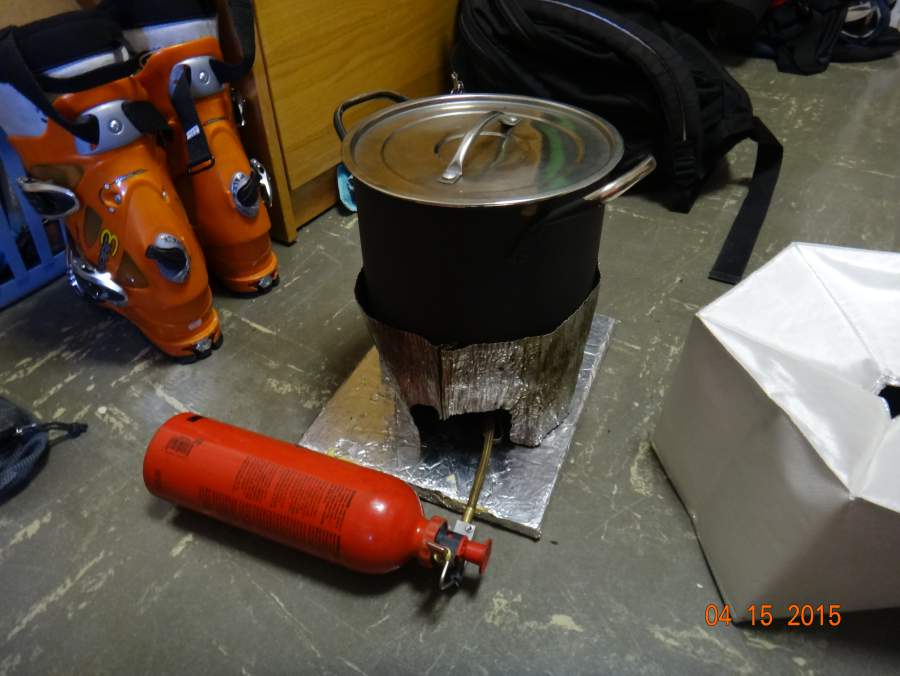
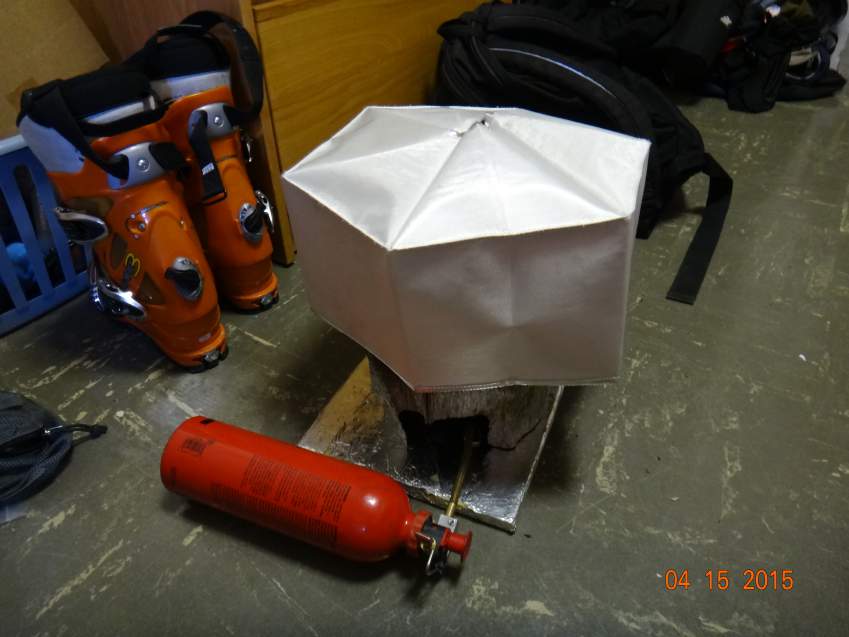
- Fiberglass insulated reflective stove board (Yea a little crazy but my buddy had some leftover fiberglass to use so what the hell. Something we screwed up on though is we did not make a mount for the fuel bottle and stove. It is ideal to have mounts for your stove setup on the stove board so the whole system moves and acts as one. Also, reflective tape is crap in the cold, it started peeling off quickly. But if perfected I believe this design is as good as it gets because it is extremely rigid and lightweight.)
Couple things to note on these pictures, in order to get the most efficient stove setup, we spray painted the pot black with high temp automotive paint to absorb infrared heat and added the pot parka to the mix to retain as much heat as possible while melting snow. On some days, we were able to fill the pot with snow and let it melt with sunlight; we also used a trash bag as a solar still when we could.
A look at the stove system:
Upper Body:
I brought a quarter zip LL Bean lightweight baselayer, a half zip microgrid baselayer, a half zip Outdoor Research Whirlwind Hoody, a Rab Xenon midlayer, a Rab Latok Hardshell and an older style Marmot 8000m parka.
After the climb, I would want a lighter hardshell, and the 8000m parka was definitely overkill, however it is such a nice luxury that I would without a doubt bring it again. Some climbers were even in 8000m suits and boots. While Denali is a very cold mountain, I think both of those are overkill.
For my mid layer, I think a 100g or 80g primaloft one jacket with hood is ideal, but for the weight the xenon which is 60g of primaloft one, is about as good as it gets. I do not recommend down for a mid layer as it will not do well with moisture from sweat. The Xenon really sucked for sea kayaking (have you even worn a soaked primaloft jacket?) which is where a fleece layer would excel.
As far as the hardshell goes, its nice to have a bomber one for the fixed lines, as you are often wrapping an arm around them while descending. The post Denali sea kayaking trip we went on also necessitated a 3-layer hardshell but overall specifically for Denali a lightweight one is the way to go because you will hardly need it.
My Rab Latok weighed in at 24oz, while my cheapo packaway LL Bean rain jacket would have been a better choice at 13.6oz. An ideal one would have a zip inner pocket, two HUGE crossover chest pockets, a volume reducer for the hood, and a cinch cord around the waist. Also avoid ones that have a front zipper flap as it just makes operating the zipper harder.
The 8000m parka I brought was easily the puffiest most insulated parka on the mountain, I even saw a couple feathered friends rock and ice parkas that did not seem as lofty. As such it is designed for extreme altitude where your body is not producing as much heat. I do not think marmot makes the parka anymore, but there are plenty on the eBay market. I was able to get mine for $280 brand new.


Head:
I brought one extra thick red socks beanie, a Serius neoprene facemask, a Turtle Fur balaclava, a thin balaclava, a buff and a flap hat. A pair of Dolgan sunglasses, a pair of Colorado sunglasses as a backup (snow blindness can happen in as little as 30 mins, so a backup pair is a safety item) and a cheapo pair of Smith goggles (leave the nice pair at home, as the pair you bring will get banged up) rounded out the eyewear.
The things I would change here is to get a flap hat with a removable flap; sometimes you just want to wear a normal baseball cap! Bring two buffs to allow for wearing a sweatband on your head and full coverage for sun. Also the thicker your beanie the better, as I only used mine when it was really cold, I would not recommend a down hat however cause your hat will get damp/wet.
My sunglasses fogged even with cat crap (its an anti-‐fog treatment) on them, so try and get a pair that has very good venting. The redundancy in balaclavas is so I could have one for sleeping and one for active use.
Hands:
I brought 2 pairs of Outdoor Research PL100s and a pair of fleece gloves as glove liners (these didn’t get used at all). I also brought a pair of large Outdoor Research Alti gloves, an older style Alti glove outer in size medium, and a pair of Firebrand Mittens.
Five hand warmers were an insurance policy for summit day. Now after climbing the mountain I would bring two thin windproof liners (PL100s are not windproof, but are the correct amount of insulation) and a well fitting pair of double gloves (not the Alti gloves), and a pair of down mittens (however not down insulated on the palm). And two or three pairs of hand warmers max.
The problem I had was the full Alti glove was not dexterous enough. The black diamond guide gloves, and offerings by Mammut and Hestra seem much better, but with a warranty like Outdoor Research it is hard to pass them up.
Also for mittens, the firebrand mittens pack about as big as my sleeping pad, and with how little use they actually get, a down pair like Absolute Zero mittens would have been a much better choice. The fingertips of the sensor version PL100s shred much quicker than the non sensor, so keep that in mind when you are purchasing liners.
On summit day I wore a pair of PL100s, and the outer of the medium older style Alti gloves pretty much the entire day. When we got to 17k camp I put in a pair of hand warmers and they worked remarkably well. I think the key is to get the hand warmers in an insulated environment as quick as possible to retain the heat they produce. Very rarely in extreme cold have I used hand warmers, I usually do not have a problem with a liner, insulated glove and staying active.
I had the firebrand mittens in my pack with hand warmers already cooking in case of myself or another climber having numb hands. This is important because when your mittens are in your pack they are at ambient temperature, so if you have numb hands the idea is to not put them in freezing mittens.
Also a thought about freezing (ie extreme frostbite) extremities: freezing feet will slightly alter your ability to climb out of a bad situation, it will suck and hurt, but you can still climb. However if you freeze your hands you are significantly hindered. You would be surprised at how little balance you have with frozen hands. How will you operate any of your equipment if your hands are like wood blocks? Good luck holding on to your ice axe!
ALWAYS carry a pair of mittens when climbing at altitude in the cold.
Lower Body:
I brought two pairs of Exofficio boxers, a pair of EMS Expedition weight liners, a pair of Outdoor Research Cirque Softshell Pants, a pair of Arcteryx Theta SV Bibs (horrible bibs. overpriced, very fragile and the zippers blow), and a pair of ECWCS Gen 3 Level 7 Trouser (army surplus insulated pants).
I think I really need to refine this system, one thought has me in the bibs the entire expedition, because the venting is so nice. But another has me in the softshells because they are overall more comfortable and have more pockets (very important). Speaking of which, my chapstick, rub on sunscreen, liquid sunscreen, camera and cell phone never left my pants pockets.
Yes you can call home from 14k with Verizon.
If I were to go again I would bring one pair of boxers, a lightweight baselayer, an expedition weight baselayer and my softshells. A superlight pair of rain pants and a pair of down pants would round out the setup and save a bunch of weight. (The ECWCS puffy pants are super warm with 160g primaloft sport, but are 29.4oz!)
Feet:
I brought two pairs of Darn Tough Mountaineering socks, and one pair of Thorlo Extreme cold socks. I brought three pairs of military surplus polypropylene liner socks. My ski boots were Scarpa Spirit 3s (too soft, I felt like I could easily out ski them) with Intuition Pro Tour Liners, and some custom footbeds I made for extra insulation (Closed cell foam and Aerogel).
To round it off I brought Forty Below first tracks overboots and a pair of Forty Below booties. The insoles of the Forty Below booties are worthless, so make sure you find the densest closed cell foam you can (Youll be standing on it) and replace them. I rarely got cold feet, but when I did it was because my heels squished the stock insoles paper-thin.
I think if you’re using a double mountaineering boot you might be able to get away without overboots. My whole body runs warm so take that into consideration.
After climbing the mountain I would say my socks setup was perfect, and that ideally I would have a modern day AT boot. But having bought the boots off of sierra trading post for 125 bucks, I cannot complain.
I sized the boots one shell size up to allow for foot swelling at altitude, extra thick socks and my custom footbeds. While I now do not think this is necessary, it is a good idea for people who have colder feet. I do not believe in battery powered anything for keeping parts of my body warm, but Thermacell heated insoles are the best money can buy for heating up your feet on demand.
Day to day I would wear the same pair of darn tough socks for active use, sleep in the other pair of darn toughs, and I saved the Thorlo Extreme Cold socks for summit day. (a BRAND new pair of socks for summit day is an unbelievably nice thing to have). Liners would get changed as needed. And every night I would sleep with my boot liners and used socks to dry them out.

Summit Day Clothing
- Overboots (I never crampon my pants, but I tore these up…)
- Scarpa Spirit 3s with Intuition ProTour Liner and Custom Footbeds

- Liner Socks
- Thorlo Extreme Cold Socks (I have not been able to find a better pair of super thick socks, although I have yet to try the dachstein knee high wool socks)
- Boxers (I did not wear a leg baselayer the entire trip. Hence the tweaking I need to do to my leg layering system) -‐Outdoor Research Cirque Pants (Pockets galore!)
- Arcteryx Theta SV Bibs (These bibs really suck, are extremely fragile, and are overpriced, I would avoid Arcteryx as a brand, the only thing they made right was the Bora 95. For Bibs full side zips are key. And lots of pockets if you can find a pair with them.)
- LL Bean Baselayer (This thing has been through so much)
- Microgrid baselayer (Probably could’ve gotten away without this piece, but its light and adds a bit of warmth)
- Outdoor Research Whirlwind Hoody (Excellent wind piece and great hood)
- *Rab Xenon (Again, if this was a tad warmer if would’ve been perfect, also the hood needs a volume reducer/head cinch thing. Great piece otherwise.)
- *Marmot 8000m Parka (Used for the summit ridge and to chill on the summit, very little active use in this piece, could get away with less)
- Buff (This is one piece of kit I could not live without)
- *Red Sox Beanie
- PL100 sensor glove liners (Would be nice if these were windproof)
- *Old Alti glove outer size medium
- *Firebrand Mittens (Not Used, but very important to thaw hands)
- *Turtle Fur Balaclava (Not Used)
*Were in my pack or attached to my harness, added the item as conditions dictated, or not used at all
I threw in hand warmers in my glove and mittens (in my pack) after our cache at 17.2k camp and they worked remarkably well up to the summit. Grabber brand I believe.
Food
We had a bunch. 5000cal/day. A good mix of freeze dried and normal food is essential. Skip the mountain house prepackaged food and go with mountain house tubs of freeze dried ingredients and design your own meals in the ziplock bags.
The idea is to reduce trash and weight as much as possible. So repackaging everything for convenience is necessary. Also not having a car in AK meant we spent a day walking to the food stores, loading up our expedition packs and hauling the food back to the hotel for repackaging. All part of the adventure.
A non-complete list of what we ate is as follows:
Instant Consumables:
- Ritz
- Pringles
- Almonds
- Walnuts
- Cheez-Its
- Wheat Thins
- Snickers
- Crunch Bars
- 100 Grand Candy Bars
- Babe Ruths
- Butterfingers
- Peanut m&ms
- Sandwich crackers
- Cheese (pepperjack)
- Grape Jelly
- Goldfish
- Peanuts
- Chocolate chips
- Pop-tarts
- Peanut butter
- Skittles
- Cookies (various)
- Chocolate covered blueberries
- Famous Amos Cookies
- Triscuits
- Beef Jerky
- Pilot Bread
- Oreos
- Reeses’
- Tortillas
- Nature Valley Bars
- Nature Valley Protein Bars
- Clif Bars
- Clif Shot Blocks
- Clif Energy Gels
- And more!
Breakfasts:
- Gritz
- Oatmeal
- Mountain House Breakfast Skillet
- Granola with Powdered Milk
- Pancakes
- Hash Browns
- Bacon
- And more!
Drink Mixes:

- Tang (Hot tang!)
- Tea
- Apple Cider
- Carnation Instant Breakfast (This is a sweet multi-‐vitamin substitute) Emergen-‐C (3 Flavors)
Dinner:
- Mac and Cheese
- Pasta with Meat Sauce
- Pasta with White Sauce
- Mountain House Shepard’s Pie
- Mountain House Fajita’s
- Mountain House Beans and Rice
- Ramen with Instant Potatoes
- Lipton Soup Mixes
- Taco Mix
- Mountain House Beef Stew
- Mountain House Ground Beef (Added to things at will)
- Mountain House Sausage (Added to things at will)
Spice Kit:
- Salt
- Sugar
- Cumin
- Hot Sauce
- Mustard
- Seasoned Salt
- Parmesan (cal/weight on some brands is very impressive! 5/cal per gram!)
- Cayenne Pepper
A typical meal consisted of one dinner, and one breakfast, and 20z of instant consumables for lunch. Since everything was very high calorie to weight ratio, this amounted to roughly 5000cal/day. Also some things like bacon, we ate daily.
Example Day:
Breakfast: Granola with Fortified Whole Powdered Milk, 16oz Hot Tang with Emergen C, 2 slices of Bacon.
Lunch: 5oz of Famous Amos cookies, 5oz of peanut M&Ms, 5 oz of Jerky and 5oz of Goldfish. 2-‐4L of water throughout the day.
Dinner: Shepard’s pie with Cheese and 16oz Carnation Instant Breakfast and 16oz Tea.
Something we could have improved on was the variety of hot drinks we brought and the sheer amount of food we had. 55lbs seemed about right but the way we were eating we could have stretched our stash to 35 days probably. We even gave away cheese and peanut butter (6lbs of each is WAY too much)
Always better to have more supplies than you need because you never know when that weeklong storm could blown in and put a dent in your stash. We gave away many things to other climbers on our day of descent.
The mountain economy is a wonderful thing. Expect to give and receive food and fuel at 14k and 11k.


After Action Thoughts
Weight.
Many climbers try and get their kit as light as possible, and I am all for that. However going on a ski mountaineering expedition to Denali is just heavy. While we could have probably saved 10lbs each with refinement on things we realized post climb, we still started with 130lbs of gear each when we first flew in.
There’s not much you can do to get around the high weight of the climb if you intend to spend a month on the mountain, which I might add almost guarantees you the weather windows needed to make a few summit attempts.
Also do not skimp on the comfort items; you’re spending a month on the mountain so you might as well bring a pillow if you’d like one!
As seen in the intro from Timothy Hult, there are no sherpas or people carrying your gear for you, and there is no infrastructure at “base camp” (except to coordinate flights out). Every single thing you have access to will be what you and your climbing team has packed. So get in shape and be mentally ready to work.
In my opinion there are many people out there who are athletic and fit enough to do this climb but they are nowhere near where they need to be mentally. I was far from the shape I wanted to be in at the start of the climb, due to laziness, but I had built a large mental reserve by doing many mountaineering trips all over the East Coast beforehand. And on that note, the weather seemed very mild to me compared to what we had experience over the past couple years in New England.
So build a strong mental mindset and enjoy hauling loads. After all you’re in Alaska looking at the largest landmasses on the planet!
Water.
Drink as much as you possibly can the entire climb. I failed to do so down low and I think if I had been super saturated the whole time I would have acclimated better and had fewer headaches.
Drinking contests, like Ed Viesturs suggests, are an excellent way to hydrate. To quote Mike Marolt’s blog, pee clear or die!
Books.
Bring a fat paperback novel that has tiny print. The emphasis is on words count per square inch. You get the idea. I brought a Tom Clancy action novel and my partner brought American Sniper, not very different but they are both definitely page turners. Some suggest bringing 2-‐3 books, but I believe you can easily trade books with other climbers so the extra paperweight is not necessary.
We actually did not read much till we were stuck in a storm at the airstrip, but if that were to happen higher on the mountain we would probably of been skiing powder! Still, bring a book.
Sun.
Full coverage of your skin is ideal. I think a nose guard is necessary, but also think I could have gotten away with less skin damage if I was more diligent about applying sunscreen. Make sure you put that stuff on every time you get a chance.
The rub on stick is very convenient. For sunglasses, make sure yours fits and vents well to reduce fog. A flap hat with a removable flap is ideal. I wish I had brought two buffs, one for a sweatband and one as an over the ears and neck for sun protection.
Tents.
Denali is a unique mountain in that you will be spending a large amount of time in your tent due to weather and the style of climbing. Go with a massive tent sized for 3 men for every 2 people.
I think a superlight bivy tent (think Mountain Hardwear Direkt 2, or a Bibler I-‐tent) is a good addition to the kit as well. It would’ve allowed us to spend a night at 17k if we needed too without hauling up a 9lb+ tent and constructing a huge tent site. They also make sweet gear lockers at 14k!
Altitude.
This sums it up my thoughts pretty well.
Size of Denali.
Denali is one of the largest landmasses on the planet, and Alaska is the home to the largest landmass, Mt. St. Elias, in the world. It is hard to perceive the size of this place, because it is so much larger than anything you have ever seen.
For instance, the great peaks of the earth (8000ers) are all very tall, but they are shorter than Denali from top to bottom. Denali has 18000ft of vertical relief, and Everest has 11000ft. Also when you look at Denali, you are looking at 35 square miles above 7000ft.
While it would take weeks to trek around the base of Denali, you could trek around the base of K2 in a few days. Alaska is truly the land of extremes. In every way.
We experienced temperatures inside our tent that were 100F and nighttime temperatures can dip below -40F during the climbing season. It truly is one of the most beautiful and intense places on Earth.


Stuff Sacks.
The trend is to leave these at home, but I think a minimum of three good compression dry bags is ideal. One for your puffy outerwear, one for your sleeping bag, and one for your head hand and foot wear.
I brought 2 dry compression sacks and 2 dry sacks. Each one was always stuffed with things that could not get wet and needed to be compacted to reduce bulk. I also had one little sack for personal items and small stuff.
CMC (clean mountain can):
Love it or hate it, you’ll be shitting in a can for the duration of your climb. Having previous experience following the rules for waste disposal during an expedition to Great Basin national park, it was nothing new for me.
It was actually called the groover for the groove it would leave on your ass if you sat on the thing. I do the floating squat technique. We had a few extra biodegradable bags for sickness issues but thankfully didn’t need them.

*Update: Denali is now implementing the Sustainable Summits program and encouraging all climbers to carry out all feces in CMC’s instead of dropping in previously allocated crevasses. If you are considering climbing (and skiing) Denali, please opt to partake in the Sustainable Summits program and keep Denali clean.
DWR and Membranes.
I really wish they’d remove the “D” from durable water repellency. The spray on stuff I used after washing and drying my shells with Nikwax DWR wash lasted for the whole trip.
I’m not sure what else a person can do than to use the wash in and spray applications for DWR. But as soon as we had sustained rain during our travels in AK, not on Denali, my jacket wetted out.
I firmly believe if you are in sustained wet weather a coat like a Helly Hansen Impertech is far superior. However for Denali, where it is very cold and dry you can get away with most anything, so a 3L hardshell is not 100% essential.
I like to go with Event for the sweathouse of my upper body and with GoreTex Pro Shell for my less sweaty lower body. Hoods. Make sure most of your layers have one and that they fit over/under a helmet. You also have to keep this is mind when you are putting layers/ your helmet on/off. Good luck taking off a layer if the hood is already under your helmet!
High Altitude Food.
Or food above high camp. Shot Blocks and Gels are the way to go for me personally, and maybe chocolate. Forget trying to digest trail mix up high. The idea is quick sugar packed energy stuff that will not upset your stomach. So test it out as high as you can get before you come to Denali.
And water, as much as you can possibly drink the day before and as much as you’re willing to carry on summit day. I carried 5L and my partner 3L, and we ended up each having 4L because we split the 2L dromedary bag (I carried it from 14k to 17k, where we cached it empty).
Acclimation.
Give Anatoli Boukreev’s book “The Climb” a read and you’ll understand how to acclimate like one of the greatest no Os mountaineers to ever live. I think had I acclimated more starting down low I would have done better at altitude.
For those living at sea level, take, as much time as you can down low, there is no rush if you have properly packed for a month on the mountain. Spending a week skiing and climbing out of 14k helped us a ton. Just don’t forget to drink drink drink like I forgot to!
Journals.
Write in them. It is easy to blow them off. Take 5 minutes before bed and do it. I regret not keeping a daily more in depth journal. The write in the rain journals seem to be the standard up there, however any notebook and a heavy duty ziplock will do the trick.
Air Taxis.
If you want to get to and from the mountain as easily as possible, go with Talkeetna Air Taxi. TAT for short.
On our day of departure, there was mediocre weather, and the only planes that extracted and dropped off climbers out of the four air service providers was TAT. They also have a sweet bunkhouse with a running water bathroom.
Pay the extra $$ and make sure you air taxi is on point! Also, make sure you bring Lisa (base camp manager as of 2015) some fresh fruit or a bottle of wine when you are flying in!
Pictures and Video.
Make sure your camera is super easily accessible yet still warmed by body heat to preserve battery life, or you will not take as many pictures as you’d like.
I took 4 spare batteries for my Sony camera and that was just enough for 19 days. So 6 or 7 batteries for a 30-‐day trip seems right (Batteries for an average point and shoot are tiny and weigh little).
Also bring your charging cord; many people are willing to share their solar chargers. Or get a solar charger yourself. I used a simple point and shoot because it is small and quick to operate. We saw guys with massive DSLRs up there. To each their own.
Base Camp Cache.
Load that puppy up! Booze, good munchies, magazines, spare batteries for the radio etc. You never know if you’re going to get stuck at the airstrip for a few days like we did. And a sip of Whiskey certainly takes the edge off of tent life.
Down Bag/Garment Care.
Do not be intimidated by caring for your own down products. A down wash and dry will make your jacket good as new! Having just done my down parka it is back to its full 7 inches of loft.
Buy a bottle of down wash (8 bucks at EMS), find a laundromat with extremely large washers/dryers (often right down the street), clean out the leftover detergent and twenty bucks later you should have your down bag and down parka cleaned, dried and loft restored.
Sure beats sending it off to some company for double the price where they treat your stuff like a dime a dozen. I believe the best care will come from you the owner. Plus don’t you just love a fluffy down parka!?

Sleeping bags.
There is so much technology these days I do not know where to begin. To simplify this, look for at least 33oz of 800+ fill power down for a -‐20F rated bag, a water resistant or waterproof (preferably) shell and make sure it has enough room to store water bottles, boot liners, a stove, a fuel bottle, goggles, all of your layers etc.
While you wont be sleeping with these things every night, you need to be prepared for the intense conditions. All that tuck stitching, stretch baffles, pertex vs conduit, 25 baffle footbox bullshit is irrelevant. I can say that it snowed 6 inches the first night of a weeklong subzero Katahdin (ski mountaineering in Maine) trip right on top of my bag while I was in it, and the waterproof outer fabric saved my trip/life.
As far as brands go, I would stick with Marmot, Feathered Friends, Valandre, Mountain Hardwear, Mammut, Rab, Western Mountaineering and anyone else who makes a down suit. Usually if the company manufacturers a down suit, they are pretty squared away on their expedition sleeping bags and down equipment in general.
From my conversations with guides and mountaineers, Valandre seems to be the best for warmth to weight ratio, Marmot for bang for your buck.
When looking at temperature ratings, make sure you consider your layers as part of the system. I slept in -30F weather in the Hermit Lake shelters at Tuckerman’s Ravine (the night Kate Matrosova died) in a -20F bag with my 8000m parka on. I was toasty, except for my face. Still trying to find a good system for face coverage sleeping in extreme cold.
I saw multiple climbers using a 0F bag with layers. If you are truly worried about sleeping warm, a -20F or -40F bag is more than enough in my opinion.
Boiled Nalgenes and layers do wonders. Also make sure you eat right and are hydrated! Water resistant down is making its way into expedition sleeping bags. As far as I know Rab is the only reputable manufacturer currently utilizing this technology in their -20F and -40F bags. I am sure Mountain Hardwear and other manufacturers will do the same as time goes by.
If you can afford it, water resistant down is clearly superior to an equivalent fill power down. If you have perfectly sunny weather and a dark colored tent, seal up the door and the vent that is facing the wind, and your tent will “bake dry” anything inside. Great for pulling moisture out of your sleep system and gloves/socks.
Boiled Nalgenes.
Heaven. They can also be used to dry a variety of things. Stick one in the foot box with your boot liners and it dries them out quite a bit. Also keeps the toes warm. My partner had an idea to bring two .5L nalgenes and put them, boiled, inside the boot liners in the morning and/or at night. This never materialized. I still am curious as to if this would work and be feasible for actual climbing use.
Rope.
A 7.7mm thick 50m long rope is as much as a 2-man ski mountaineering team needs. (We used a Mammut 60m 8.9mm dynamic rope, overkill and heavy) Make sure it is as light as possible and opt for low stretch versions. More stretch means you fall further into crevasses. Rope tension while traveling is key.
Ice Axes.
A general mountaineering axe is the way to go if you are sticking to the west butt. Bring the ice tools if you want to climb any of the popular ski routes (Messner, Orient, Rescue Gulley). We brought some tools along as well, but the conditions were bad for skiing so we hardly used them to climb the ski routes.
Insulate the head of your ice axe. It’ll save you from having to switch to mittens, or in extreme cold, save your hands altogether! I also favor leashes to your harness instead of your hand or wrist, it makes switching hands easier and promotes proper technique. Also a pick protector is a good idea for your luggage during travel.

Headlamps.
Useless, it is always sunny during the normal climbing season.
Finally…

If you have any questions please do not hesitate to contact me. (jeffrogers_2795@yahoo.com)
Other climbers such Jim Gile, Mike Marolt and a coworkers father were extremely helpful in the questions I had, so I would like to offer the same type of communication and advice to other prospective climbers or people who are just interested in the subject.
Helpful Links:
- Stats: http://www.nps.gov/dena/planyourvisit/upload/OVERALLCLIMBERS-thru- 2014.pdf
- Good Info on climbing: http://www.bradleyalpinist.com/goodbeta.html
- Overview Map: http://listsofjohn.com/mapf?lat=63.0728&lon=-151.0271&z=12&t=u
- Personal Gear Checklist: (Do not follow exactly, more of a guide than a hard list) https://www.whittakermountaineering.com/gear-guides/mckinley-west-buttress- gear-guide
- Blog: http://8kpeak.com/blogs/sneak-peak/18637335-climbing-with-supplemental-oxygen-by-the-numbers
Recommended Reading:
- Freedom of the Hills
- Colby Coombs Guide to The West Buttress
- Anatoli Boukreev’s The Climb
- High Altitude Medicine and Physiology
- NOLS Cookery
- Denali’s Howl
- White Winds
- Minus 148F
- To The Top of Denali
- Ski Randonee by Jean Vives
- Snow Sense
And remember…
While Denali is a serious ski mountaineering endeavor, remember to have fun with it!
Prior to heading to Denali for the “Between The Peaks” follow-up expedition, Ethan and I ran into Jeff near the base of Mount Washington’s Tuckerman’s Ravine. A dense fog had just eaten the headwall Jeff skied down and we were going to wait a bit to see if it would lift before starting our ascent. In passing, we told Jeff about our upcoming AK plans and he told us about his 2015 Denali trip. Afterwards, we connected on FB and he sent us the most comprehensive (and appreciated) guide to help in our planning period!
He had written the above “After Action Report” and had it in PDF form. This thing was just oozing with helpful insights and information from a badass first-hand experience skiing Denali. I’m absolutely stoked we could get Jeff’s report published here and get this info out into the world where it will help other aspiring ski mountaineers in the Alaska Range and beyond!
Thanks Jeff! Great stuff
Happy to be part of the site! Thanks!
Hey Jeff,
Just to clarify did you ski from the summit itself, or only from 14,000′.
And if you didn’t ski from the top did you still climb the rest of the way in your ski boots?
Hey Trever! I know you’ve been in touch with Jeff on this, but just for other readers who may have the same question, Jeff did ski the summit ridge – airstrip – and did wear ski boots the whole way.
Can you please add a comment that the current leave no trace policy is to fly your poop out. there is a substantial amount of information out there explaining the harmful environmental effects and flying it out is now the most common and best practice