Greetings, ya scallywags! It’s your Captain, Captain Red Beard here, and I’ve got quite the list for ya. If you have ever thought to yourself, “Hmmm…you know, I REALLY want to spend a month climbing North America’s largest mountain and then I want to snowboard down it” (as most of us have certainly thought multiple times), then you’ve come to the right place.
First, a note about our experience splitboarding Denali. In short, splitboarding Denali was a grueling undertaking and in the end we did not find it to be super practical for much of the time on the mountain. We simply could not find an efficient way to descend while roped up with heavy sleds in tow…or in front, depending how you rig it based on the degree and direction of slope.
If we took over a month to climb and made numerous double/triple carries in between camps that would enable us to snowboard down from caches with no sleds, then splitboarding may have been more feasible. Unfortunately, that wasn’t the strategy for this expedition as we were climbing at guide book pace and practicing a single and double carry ascent.
Even though descending was a complete pain in the rear, I’d choose taking the splitboards up again over snow shoeing. Not only is it quicker and way more efficient to skin on the lower glacier, but it’s 100 times more safe while traveling. After our experience on the Great/High/Big One, and after seeing and speaking with a few skiers on the mountain, I’d safely say that ski touring is the most effective and efficient way to go on Denali.
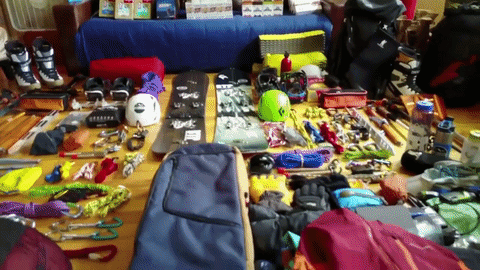
But, with all that being said, there are those that are complete bad asses and have summited (I did not) Denali on splitboards. So, without further ado, here is a very thorough, comprehensive (and long) list of every single Item making up the 134 pounds that I lugged up this beautiful beast!
 The main purpose of this list is to provide a reference for those thinking of climbing and/or splitboarding Denali. While prepping for the climb, I read countless gear lists and trusted some of them blindly.
In this list I wanted to add brief descriptions as to why items were brought, whether or not the items were efficient, and how much each item was actually used.
For those about to set out to Denali, please read, ponder my thought process, and then make your own educated decision as to what to bring yourself. We were a team of 4 planning on being on the mountain for 24 days. I am 5’11’’, and 167 lbs. A few of the items on the list were split between team members to distribute weight.
Splitboard Setup
- Jones Explorer Splitboard (Size 159)
- Karakoram Prime SL binding (I bought a toe piece separately. The toe strap on the SL’s used to be a rubber loop, but a full and secure buckle strap is necessary, in my opinion)
- Karakoram Flex-Lock (For touring mode. Some swear by these, but I could go without)
- Backcountry.com Splitboard Skins (made by G3)
- Splitboard Crampons (Good to have, but we only attempted to use once up Motorcycle Hill. We transitioned to crampons all the way up to 14k camp after that. Would not bring again, and would just plan to crampon during steep sections such as Motorcycle Hill, Squirrel Hill, and Windy Corner)
- Fitwell Backcountry snowboard mountaineering boot, size 300 mondo (Excellent boot, but sizing is strange. I should have been a 295, but needed to size up. Be sure to do your research if using.)
Hardware and Rigging
- Plastic expedition sled provided by Talkeetna Air Taxi
- Black Diamond Couloir Harness (Pretty good, lightweight harness, but it pulls in some annoying places when traveling on a rope team. I may swap for the Singing Rock Flake Harness next time)
- Black Diamond Raven Ice Axe (Contemplated bringing my Petzl Summit Evo axe, which would have been nice on steeper ascents for snowboard missions above 14k. Opted to stick with the Raven, but honestly used the Whippet more than anything.)
- 1 Black Diamond Whippet pole (Amazing piece of gear, but I would opt to get the Carbon Whippet if you’re looking to buy one. The regular aluminum poles do not get small! At all. They’re not meant to be put away. But the Carbon Whippet is much more collapsible.)
- 1 Black Diamond Alpine Carbon Cork pole (I dig these, Ronzio swears by the tri-fold Carbon Z poles)
- Black Diamond Sabretooth crampons (Ronzio used Petzl Lynx Leverlocks)
- 2 Black Diamond Express ice screws, 22mm and 16mm
- Gerber multi-tool with knife (Never left my bibs pocket)
- 1 SMC snow picket, 24 in. (Recommended to have at least 2, but in a rope team of 4 and all knowledgeable in crevasse rescue, we decided 1x team member was enough. They came in very handy for staking tents in deep snow)
- BCA A-2 EXT Shovel with Saw (You will want at least 2 snow/ice saws for your team to properly fortify camps, dig tent pits, cut snow chairs, cut blocks for melt water, etc.)
- BCA Stealth 240 Carbon Avalanche Probe
- BCA Tracker 2 avalanche beacon
- 2 rescue pulleys (I use the Petzl Mini Prusik Minding Pulleys. Love them. Super light.)
- 1 oval carabiner (For chest harness)
- 4 large twist locking carabiners (Do not bring screw locks! They will freeze and become a pain in the ass when using on the fly)
- 6 medium non locking wire carabiners (I probably would have brought 10+. I was amazed by how many I used for sled rigging and securing gear to my pack when traveling the glacier)
- 2 small non locking wire carabiners (Used for leashes when on splitboard in touring mode)
- 3 Prusiks, 6mm (Should have had at least 5. We used more for sled rigging and other misc. actions than expected)
- 1 Texas foot prusik
- 2 nylon double runners
- 2 slings, 11mm
- 1 Black Diamond Daisy Chain, 12mm – 140cm
- Nylon chest harness (Cut and fashioned these ourselves with nylon webbing and water knots)
- Misc. cordelette and slings for emergency
- Sled rigging chord
- 25 feet of 4mm chord for your pull line attached to your pack
- 25 feet of 5mm chord for your duffle and misc. gear sled tie down line
- 25 feet of 1/4″ bungee nylon chock chord
A note on sled rigging:
There are countless debates on sled rigging. As the saying goes, “There is no perfect way to rig a sled on Denali. If there was, everyone would do it.” I found the bungee chord to be a very efficient addition when going uphill, but only if you get the difference of lengths of your bungee vs. your chord correct. If your bungee is too long, it will be ineffective. If your bungee is too short, your sled will keep bouncing behind you and will stop and start too frequently. If you get the distance right (your sled being about 8-10 feet behind you and your bungee slightly longer than your chord that attaches your sled to your pack), the bungee will ease the weight distribution and will then be supported by the chord. A bit confusing when reading, I know, but it should make sense when you start experimenting with rigging systems. Some swear by using PVC piping for descents. We decided against it, and I probably would again to save weight even thought it would make some descents easier.
Packs, Layering Systems and Clothes
- Gregory Denali 100L Pack
- Gregory Alpaca 120L Duffle
- Forty Below camp booties (These worked amazing in boot shells and overboots)
- Forty Below purple haze over boots (No alterations needed, semi-auto clip crampons seemed to work after crampon adjustment, although I only tested before leaving for the climb and not on the mountain)
- Socks: 2 pair Darn Tough merino wool extra cushion mountaineer socks, 1 pair REI merino wool liner sock, 1 pair thick wool Keen hiking socks, 1 pair thick wool socks for sleeping (Having a pair of fresh socks for climbing in the sleeping bag after a long day when your feet are pruny, smelly, and blistered is clutch. Also, save a fresh pair for summit day so that they function at peak performance and haven’t been sweat in multiple times)
- 2 pairs of long johns (Mine were made by Columbia and REI. Both worked great)
- Arcteryx Atom LT down pants (The debate with the team was outer down insulated pants vs. under down insulated pants. With outer, you can easily throw over your GoreTex bibs in a quick pinch if needed. I liked these pants because they could get away with either and they have full zippers on both legs, which made them versatile in various situations. Ryan got some similar to mine, while Jake went with Feathered Friends Helios pants and Ronzio got Western Mountaineering Flight Down pants. Those looked awesome. To each their own!)
- Outdoor Research Mentor bibs (A classic, and I’ve used them for over 6 years. They are awesome)
- Intuition Luxury Liners (Using backcountry splitboarding boots instead of strictly high alpine made mountaineering boots such as La Sportiva Spantiks, Baruntses, or Olympus Mons, we decided the more insulation the better. Intuition Liners are the way to go for any and all of your boot liner upgrades. They’re amazing. Ronz and Ryan used the Intuition Pro Tour model.)
- Outdoor Research Expedition Gaiters (Make sure you get the expedition gaiters if you are going to use a snowboard mountaineering boot. I got an OR XXL Crocodile gaiter, and they still didn’t fit. For a snowboard boot, you need the Expedition XL or bigger.)
- 3 pairs compression shorts / boxers
- 3 long sleeve heat centric base layers (My favorite base layer is a merino wool made by Patagonia that has a built in hood. The other two were OR and Hot Chillys)
- 1 long sleeve performance sports T
- Down sweater (Patagonia or Eddie Bauer)
- Eddie Bauer Sandstorm Shield hooded soft shell jacket
- Outdoor Research Incandescent Hoody (I love this jacket. Weighs next to nothing, and if you throw it in a stuff sack you have a packable and a hell of a warm layer for hanging around the tent or keeping in an accessible back pack pocket in case of a sudden storm)
- Outdoor Research Axiom Hardshell Jacket
- Eddie Bauer Peak XV Down Jacket
- Julbo Explorer 2.0 Sunglasses, Camel, photochromic cat 2 to 4 (At points, I felt like I had to squint, however it was well worth it when there was less than perfect and white out conditions. I’d bring them again.)
- Snowboard goggles
- Wool hat/polar fleece beanie
- Balaclava / full face mask
- Base layer gloves (Avoid touch screen compatible base layer gloves if possible, they rip/tear much faster than non touch screen compatible)
- Outdoor Research Contact Gloves (I think they stopped making these, but if you can find them, they are the best. Get a glove like them for general work around camp)
- Black Diamond Guide Gloves
- Outdoor Research Alti Mitts
Camping / Cooking
- Hilleberg NAMMATJ GT 2 person tent (Awesome, bomber tent. Vestibules were awesome to cook in when needed. We had a 4 person team, and brought 3 sleeping tents. 2 up the mountain, and once emergency left cached at base camp)
- North Face Inferno sleeping bag (Ryan and I had these. Jake and Ronz used Marmot sleeping pads, the -20 Col Membrain, and the -40 CWM)
- ThermaRest NeoAir XTherm sleeping pad (Jake, Ryan, and I had these. Ronzio used an Exped Winterlite Downmat UL Winter pad. The Exped has a marginally higher (warmer) r value, but both pads are great.)
- ThermaRest Z Lite sleeping pad (under the air mat, over the tent floor insulation)
- Forty Below tent floor (Amazing addition and worth its weight in gold when sleeping on a glacier. Stock size fit our Hilleberg Nammatj 2 person tent perfectly)
- Sierra Designs Mountain Guide Tarp (Cook tent. Again, adds weight, but worth it on down / storm days. Make sure to take down the pole when a storm or high winds are predicted. Ours snapped, and we had to stabilize with my hiking pole, which I did certainly did not want to break as well. Here may lead to an argument to bring PVC piping for sled rigging, as you can use one of the PVC pipes to stabilize the cook tent pole and to stake tents in deep snow)
- Plastic bucket lid (We used this to keep our cook tent pole stabilized in melting snow. Melt a small hole in the plastic lid with a lighter, and use it as a base stand)
- Stoves: We brought 3 for a 4 person team, and carried them all up the mountain. 2 MSR XGKs, and 1 MSR Whisperlite (We figured it would be beneficial to have 2 types of stoves as they sometimes work differently at different altitudes and temperatures. We melted water in pretty much every free minute we had, and having 2 stoves under a medium sized pot seemed to be the most efficient method)
- 4 Gallons of white gas provided by Talkeetna Air Taxi (1 Gallon per person, which seemed like the right amount for us)
- One 30 oz MSR fuel bottle and two 20 oz bottles
- Cooking pots: GSI Halulites (4.7L, 3.2L, and 1L)
- Assorted GSI cutlery (sporks, stirring spoon, towel)
- GSI Fairshare II Mug (THE. BEST. End of story.)
Water
I put this section separately, as it’s beyond important to suck down as much water as possible along the whole expedition. It took a few days to get a system down, but it came to fruition eventually.
- 20 oz Camelbak Chute, insulated thermos (Kept on my harness on a carabiner. This was key for quick stops without having to take off the pack. I would refill at longer breaks. I ususally started long days with some sort of electrolyte drink mix)
- 1 liter Nalgene (Kept on outside of my pack with a Forty Below Nalgene cover)
- 1.5 liter Nalgene (Kept inside my pack, insulated next to my down jacket)
- 1 liter GSI Glacier Stainless Vacuum Bottle (Kept in my duffle rigged on my sled. This kept drinks hot/warm for 12+ hours)
Personal Med Kit and Toiletries
Aside from what I brought below, we had a group med kit with more serious medicines and medical equipment to treat disaster grade injuries and HAPE/HACE (Dexamethasone being one of those extra things).
- Diamox (prescribed)
- Band aids (Much needed for blisters and minor cuts that don’t heal because you are at altitude)
- Moleskin (Wish i had MUCH more for blisters)
- Gauze
- Disinfectant wipes
- Aquaphor (travel size)
- Burt’s Bees face wipes, 20x
- Flushable wipes, 20x
- Roll of TP
- 3 SPF 30 Chapstick (One of these never left my bibs pocket)
- 2 tubes toothpaste (travel size)
- 1 toothbrush (travel size from CVS)
- 1 mini bottle of AXE body spray (A real moral booster for the tent mates)
- 1 stick anti perspirant / deodorant
- Q Tips (travel size pack)
- 3 bottles Purell (travel size)
- Multivitamins, 20x
- Juice Plus veggie and fruit supplements, 20x
- Ibuprofen, 30x
- Ibuprofen PM, 20x (Did not need the sleep aid, would leave behind next time)
- Anti-diarrhea pills, one cycle
- 12 caffeine pills (I would leave behind next time. They messed with my heart rate)
- Sunscreen: One travel size, one medium size bottle, SPF 50 (I kept the travel size bottle in my bibs pocket, and it never left my side. I would apply multiple times a day, and on most breaks, and I would re-fill the smaller bottle from the larger bottle after widening the opening on the smaller bottle with my knife. I can honestly say I did not get sunburned while on Denali because of this system)
Personal Entertainment
- Kindle Paperwhite (Slept with in sleeping bag and worked great)
- Journal and pen (Do not bring gel based ink pens, they explode at altitude. Write in the rain notebooks work best for these kinds of expeditions)
- Deck of cards
- Board game for base camp (We brought Settlers of Catan. It was epic the night we returned to base camp)
- Mini backgammon set (Did not use, but would have been good if we stayed longer at 14k camp waiting for a window. Ended up playing a bunch over beers before our flight in Anchorage)
Personal Electronics
We were of course filming the follow-up to Between The Peaks, so Ronzio carried the bulk of the more serious camera gear which included his Canon EOS 80D plus 3 batteries and 4 SD cards, GoPro Karma Grip, GoPro Hero 4 plus 2 micro SD cards and 2 batteries, Manfrotto Compact Action Tripod, Peak Design Capture Camera Clips and Straps. What I brought is below.
- 1 GoPro hero 4 (Rarely worked due to cold temp draining battery life. Probably would leave behind next time unless GoPro does something to seriously improve their batteries. DSLR cameras work the best in the cold, but are heavy and bulky. Ronzio managed his well, and that camera worked 100% of the time, even frosted up in white outs, without having to worry about the cold killing the batteries.)
- Olympus TG Tough point and shoot camera (Great small and reliable camera for the conditions. This worked very well for me)
- Goal Zero Venture 30 Solar pack (the Venture pack add on is clutch. Worth the $. Ryan, Jake, and I had this Goal Zero set up, with all our own charging cables, and Ronzio carried the Goal Zero Sherpa 100 kit which is absolutely bomber, but heavy. It included the inverter he needed for Canon batteries.)
- iPhone (Used for music)
- Garmin eTrex 30 GPS (Jonathan had the Garmin InReach Explorer+. Thing was awesome. All the GPS tracking functionality of the eTrex 30, which is already amazing, plus a 2-way satellite messenger. If you can afford getting one, this is the GPS to get. You pay a cheap monthly fee for as many text messages to as many numbers/emails as you want. And you can also get the weather)
- BCA Link Radio (each member of our team had one of these and they are without question the best radio I’ve ever used in the backcountry)
Things that I Wish I had More of:
- Crevasse rescue gear, like more prusiks, slings, and biners (I had enough, but after figuring out sled rigging for the first time, most of my rescue supplies were used up. I had them, but it would be a pain, and maybe impossible, to have to retrieve all the gear during an intense rescue scenario. Make sure to practice an actual rigging system beforehand, and then plan for additional equipment to stay on your harness for rescue scenarios)
- Moleskin (For blisters)
- Band aids (I felt like I was rationing, and they fell off frequently due to sweat and putting on / taking off gloves)
- More Duct or Gorilla tape (Can’t have enough)
- Energy Chews (My stomach didn’t handle the energy gel shots that well)
- More tissue material for blowing nose in the tent (TP or tissues)
- Speaking of tissues…Cold/cough/congestion medicine (You may not get sick up there, but I did.)
Basecamp Cache
Right after arriving at Kahiltna basecamp, we packed a 90L duffle with supplies we would be leaving there. Inside our basecamp cache was the following.
- Hilleberg Saivo 3 person tent
- Extendable painter’s pole. Mr Long Arm to be specific. (The thought was to use this with out cook tent to extend the height if we dug a deeper foundation. But we left it at base camp. It could have been useful in preventing our cook tent pole from snapping in the storm that we experienced at 14k camp but we got by without just fine)

- Extra pair down mittens
- Extra down jacket
- 5 days worth food + snacks
- Extra Ice Axe
- Extra shovel
- Settlers of Catan board game
- 1 CMC bucket (We brought 4 up the mountain and left a freshie for the base)
- Two six packs of beer donated by Aspen Brewing Company
- Pint of celebratory “return back to base camp safely” whiskey
What’s missing from this extensive packing list?
FOOD! Food merits its own post.

The full food plan that got us through our weeks on Denali is coming. Stay tuned!
One final note. As with every expedition, be sure to pack out what you packed in. “Leave no trace” can be incredibly difficult on a trip of this scale and this length, but the only thing we left behind on Denali was our pee.
It’s important to protect the wild places of the world and leave them as pristine as you’d want to find them. They just started piloting a Sustainable Summits program on Denali and we opted to take part in that, carrying Clean Mountain Cans (CMC’s) with us to each camp and not tossing any trash or poop into crevasses. If you’re headed to Denali anytime in the future, please choose to do the same. Ranger Roger Robinson heads up the program and he’s the man! You may have your climber orientation with him.
Finally, here’s what it looks like flying off Denali!
Two important things to note:
First- A special shout out to Sterling ropes. Not only did they give us their new Fusion Photon Double Dry 7.8mm (70 m) rope for glacier travel, but they also gave each Between the Peaks team member a special Sterling buff for the neck. It was smart, it was stylish, and it was sexy. I did not take it off once in 15 days. In all seriousness, the rope was absolutely amazing, and I’d highly recommend any climber and/or mountaineer to check out their stuff here:
https://sterlingrope.com/
Second- My helmet used was a Black Diamond Vapor. It was awesome, but I’d also recommend the Black Diamond Vector. One of our team members had this helmet, and I found very little difference and it retails around $75 vs. around $112 for the Vapor.
-Captain Red Beard
Hello Ethan, this was a great write up. Thank you for going through this effort to share your lesson’s learned. I was trying to find your food post that you reference in this article. Have you completed this post? Where might I read it?
Curtis- My apologies for the delay, and thanks for the props. I’m not sure if the full food list was published, but I do still have my food prep list on paper. If you’d like, DM me on Instagram (handle: epatricklee ) with an email address, and I can send you an email with some scanned copies. Cheers!
-Ethan
Ryan/Ethan,
Thanks a lot for the great insight. I’m prepping for a Denali trek and considering whether to Splitboard // or use a touring ski set-up. I’m a much more comfortable rider, so I’m slightly inclined to go this route.
My question is about the boots: is a standard snowboard boot setup (I wear Burton Cartels) adequate with the addition of an Intuition liner? Or do you recommend a top-of-the-line backcountry boot? Or could you get away with a standard boot and then wear something like the 40-Below overboots on summit day?
It would be great to heat what you think!
Keep up the shred,
Pat
Hey Pat! So pumped for you, Denali is just incredible. The boots were by far the price of gear we worried about and went back and forth on the most. Having researched and tested a lot of options, I would advise you to go a step up from normal snowboard boots. One reason, the boots you have likely fit great with a mid-weight sock at the resort or skin track, but with a heavy liner, 2 layers of socks, and feet swelling at altitude, I’m imagining that they’ll be too tight and could risk frost-bite with poor circulation. Typically for a high-altitude mountaineering boot you want a half size up to account for all of that. Also, do your regular snowboard boots have crampon welts? Because you are going to need to be able to attach crampons to your boots for sure, and some like the Fitwell Backcountry, or the Deeluxe XV, maybe a few Jones models, are made for that. I opted for the Fitwells over the Deeluxe because as nice as the speed lace system would be up there with bit mitts on, I didn’t trust that it wouldn’t break and it’s just easier to bring an extra boot lace. But that said, you’ll also need to make sure your crampons fit on your boot WITH the overboot on as well, and cut out small bits of the front and back of the overboot if you need to. Pretty crucial. Hope all that helps! Happy to answer any other questions. Best of luck in the planning/prep/training!
Jon,
Thanks a ton for the great advice. I’ve started looking into boots and plan on using a similar approach to tackle the mountain. Will definitely hit you up if I run into any other road blocks along this journey! Best of luck in whatever you’re tacking these days!
Hi, Im wondering how tall Jake and Ronz are and what sizing theirs marmot sleeping bag are. I have problem my self I cant decide which one is better to me. Im 5`10-5`11 tall. Thank you!